Optimizing LLM Costs in Deepchecks on SageMaker
Learn to reduce LLM costs in your Deepchecks SageMaker deployment by configuring cost-effective models, controlling data volume, optimizing property usage, and monitoring spend.
This guide covers cost optimization specific to AWS SageMaker deployments, where all LLM inference runs through your own Bedrock models. If you're on SaaS, see Usage Management and Optimization instead.
When running Deepchecks on AWS SageMaker, all LLM inference runs through your own models and API keys. We know that LLM usage can accumulate quickly and become expensive - especially in agentic use cases with many spans per session. That's why we're continuously working to help you control costs: both by building cost-efficient defaults into the platform and by giving you the tools and guidance to fine-tune usage for your specific workflows.
This guide walks you through every lever available to reduce LLM spend, organized into four areas:
- Platform Configuration - one-time settings that reduce baseline LLM usage
- Controlling Data Volume - manage how much data gets uploaded and evaluated
- Property Optimization - fine-tune which properties run, on what data, and how
- Monitoring & Ongoing Optimization - track spend and iterate
Part 1: Platform Configuration
These are one-time (or infrequent) settings changes that reduce your baseline LLM costs across the board. We recommend considering these before uploading any data.
1. Use a Cost-Effective Model for Basic LLM Features
Deepchecks uses two model tiers for all LLM-powered features in the platform:
- Basic model - used for most LLM features and to calculate most properties. This is where the bulk of your token usage comes from.
- Strong model - used for advanced features that require higher reasoning (e.g., Completeness, Instruction Following, Coverage, Planning, Retrieval evaluation).
Choosing a cost-effective basic model has the single biggest impact on your LLM costs. We recommend Claude Haiku 4.5 for the basic tier.
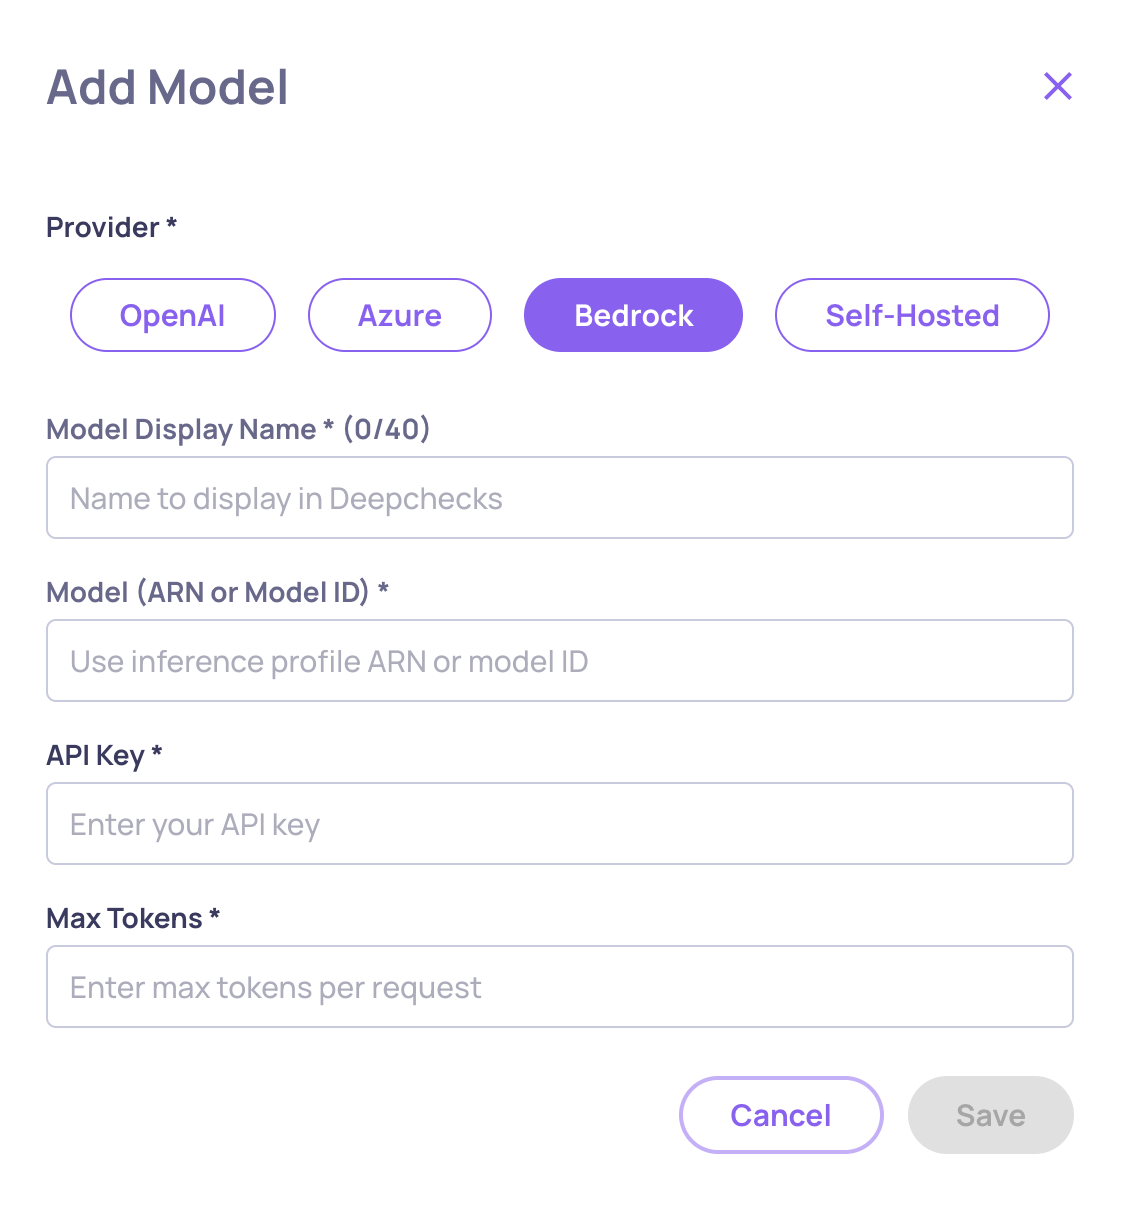
Step 1: Add the Model to Your Available Models (Can only be done by Owners)
-
Navigate to Workspace Settings → Preferences → Manage Models (cog-wheel icon).
-
Click Add Model.
-
Select AWS Bedrock as the provider.
-
Enter the model ARN or identifier (e.g.,
anthropic.claude-haiku-4-5-...). -
Set a Display Name (e.g., "Claude Haiku 4.5") and configure Max Tokens.
-
Click Save - the platform will validate connectivity before adding the model.
Step 2: Set the Basic Model on Existing Applications
- Go back to the Manage Applications screen.
- Click Edit Application on each of your applications.
- In the Basic LLM Features dropdown, select the newly added model (e.g., Claude Haiku 4.5).
- Save changes.
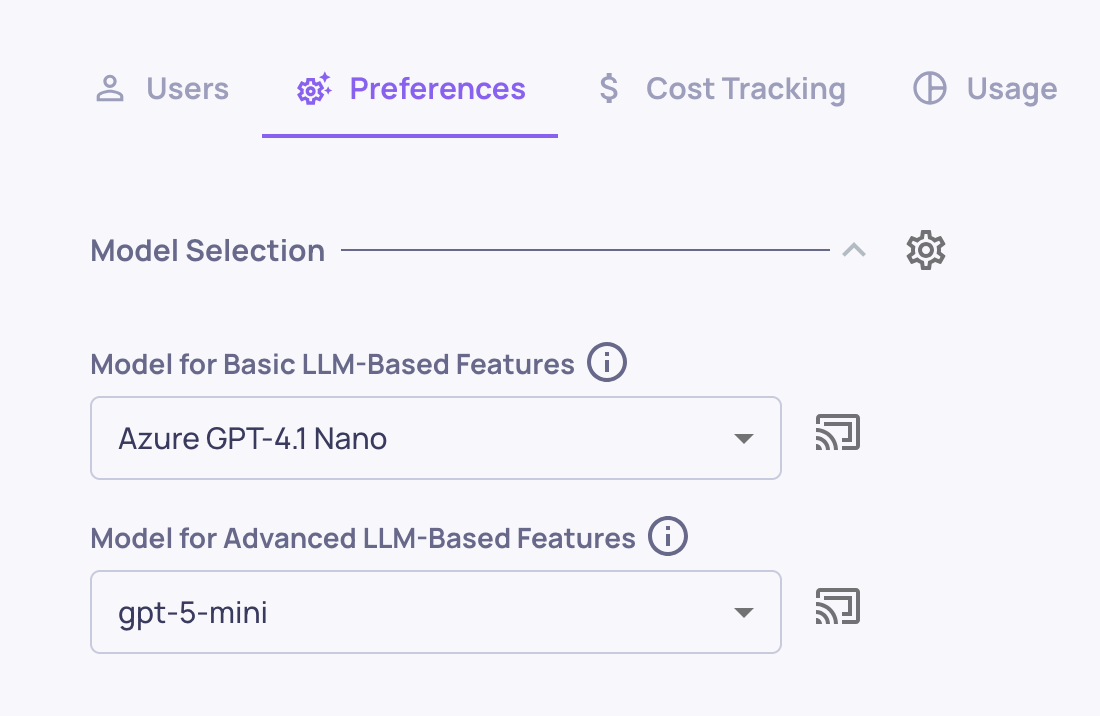
Step 3: Set the Default for New Applications (Can only be done by Owners)
-
Go to Workspace Settings → Preferences.
-
Change the default basic model to the newly added model.
-
This ensures any new application created in your organization will use this model by default.
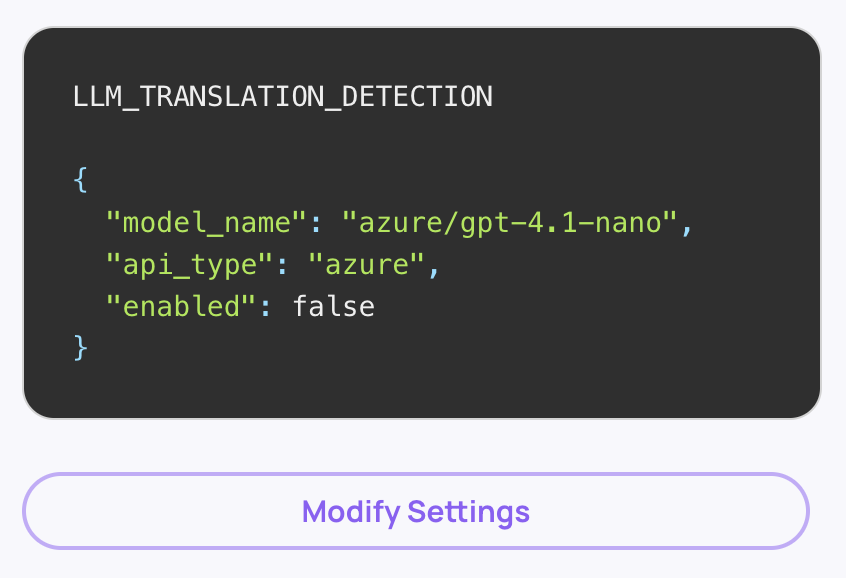
2. Disable Language Detection (If Your Data Is English)
Deepchecks can automatically detect the language of your data and translate non-English content before evaluation. This detection step uses LLM calls on every interaction. If your data is in English or if you don't mean to utilize any of Deepchecks' GPU-based properties, you can safely disable this to save tokens.
How to Disable (Can only be done by Owners)
- Navigate to Workspace Settings → Preferences → Application Settings.
- Find the Translation_Detection setting.
- Set it to false for all applications in your organization ("All Applications" checkbox should be checked).
This disables the LLM-based language detection step across the board.
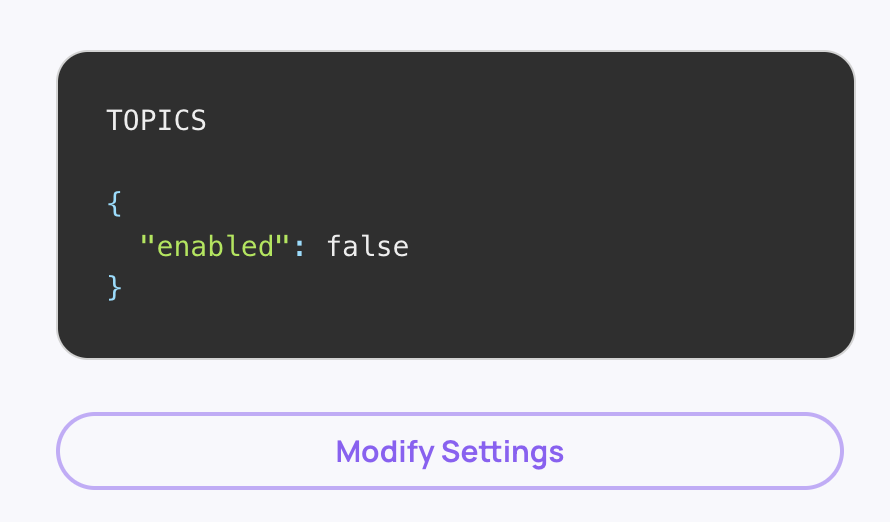
3. Disable Automatic Topic Classification
Deepchecks automatically classifies your sessions into topics using LLMs - both for training topic models and for inference on new sessions. If you don't need topic grouping, disabling this saves significant LLM usage.
How to Disable (Can only be done by Owners)
- Navigate to Workspace Settings → Preferences → Application Settings.
- Find the Topics setting.
- Set it to disabled for the relevant applications.
When disabled, the platform skips both topic model training and per-session topic inference entirely.
Part 2: Controlling Data Volume
LLM costs scale directly with the amount of data that gets evaluated. These recommendations help you control how much data flows through your LLM-powered properties.
4. Keep Configuration Costs Low - Upload Minimal Data During Setup
When you first set up Deepchecks - creating applications, configuring properties, and testing your evaluation pipeline - every uploaded session gets processed through all active properties. In agentic use cases, even 10+ sessions can generate substantial LLM costs due to the number of spans per session.
Best Practice
- During the configuration phase, upload only a handful of sessions (3-5 is usually sufficient) to validate your setup.
- Focus on getting properties, interaction types, and thresholds right before scaling up.
- Only after you've finalized your configuration should you begin uploading your actual production or evaluation data in bulk.
This avoids paying for LLM evaluation on data that's only being used to test your setup.
5. Optimize the Size of Your Evaluation Dataset
Deepchecks evaluates comprehensively - from individual tool calls and chain steps to entire versions. More data doesn't always yield better insight, but it always costs more.
Best Practice
- Determine the minimum dataset size that gives you statistically meaningful results for your use case.
- If your evaluation set is already large enough to draw conclusions, don't add more data just because it's available.
- Remember that in agentic workflows, each session can contain many interactions and spans, all of which get evaluated. A dataset of 150 traces with deep span trees is very different from 150 simple single-turn interactions.
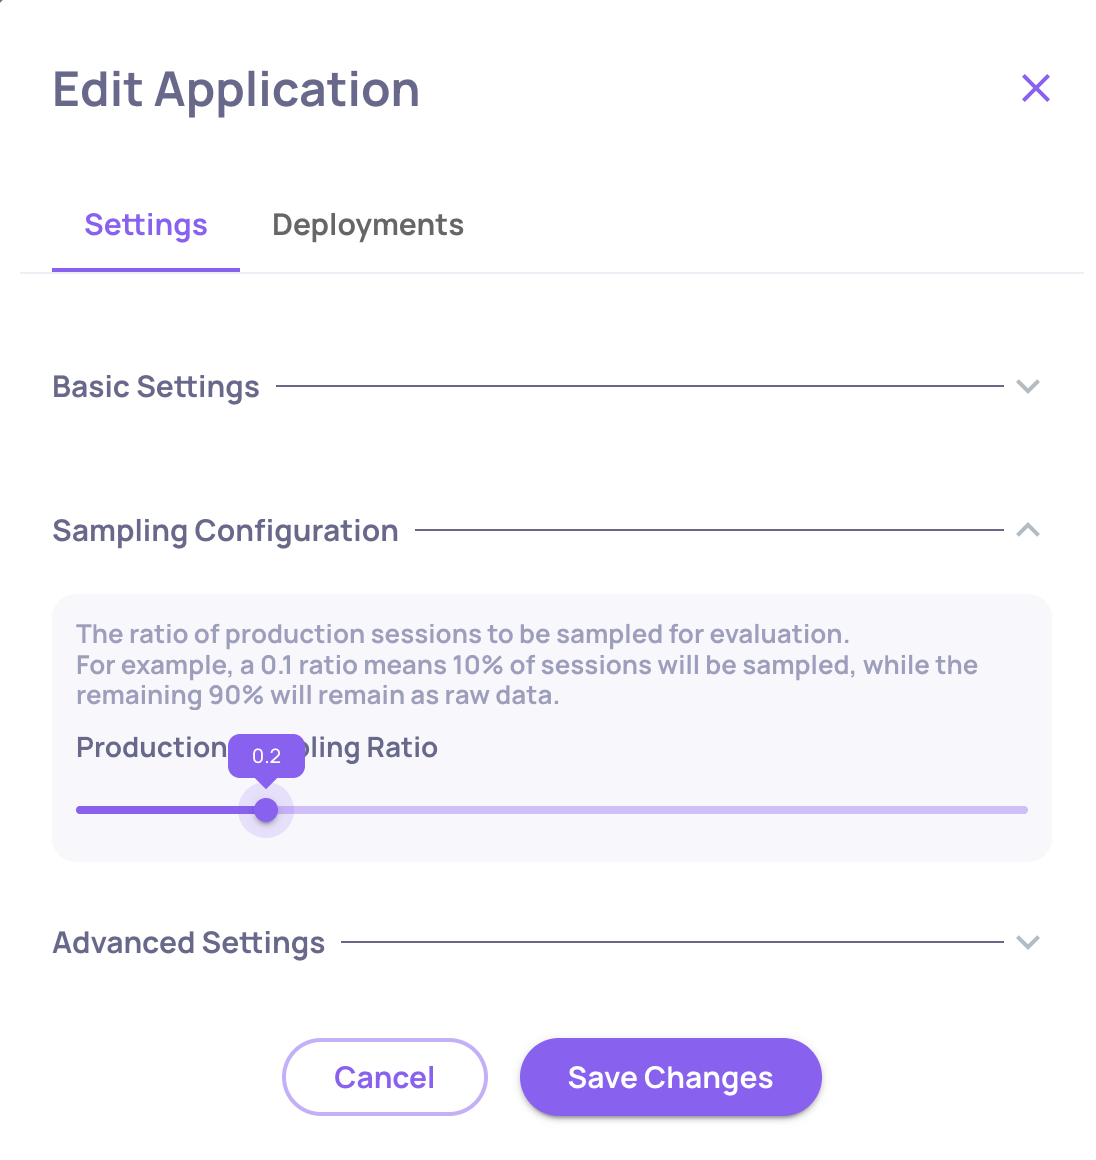
6. Sample Your Production Data
You don't need to evaluate every session in production. Deepchecks supports sampling - randomly selecting a percentage of sessions for full evaluation while storing the rest at minimal cost.
How to Configure Sampling (per application)
- Go to the Manage Applications screen.
- Click Edit Application on your application.
- Set the Sampling Ratio (a value between 0 and 1). For example,
0.2means 20% of sessions are evaluated; the remaining 80% are stored but not processed through LLM properties. - Click Save Changes.
Note that all unevaluated data can manually be evaluated in the future.
Part 3: Property Optimization
Properties are where most of your LLM tokens are spent. These recommendations help you run only the properties you need, on only the data that matters.
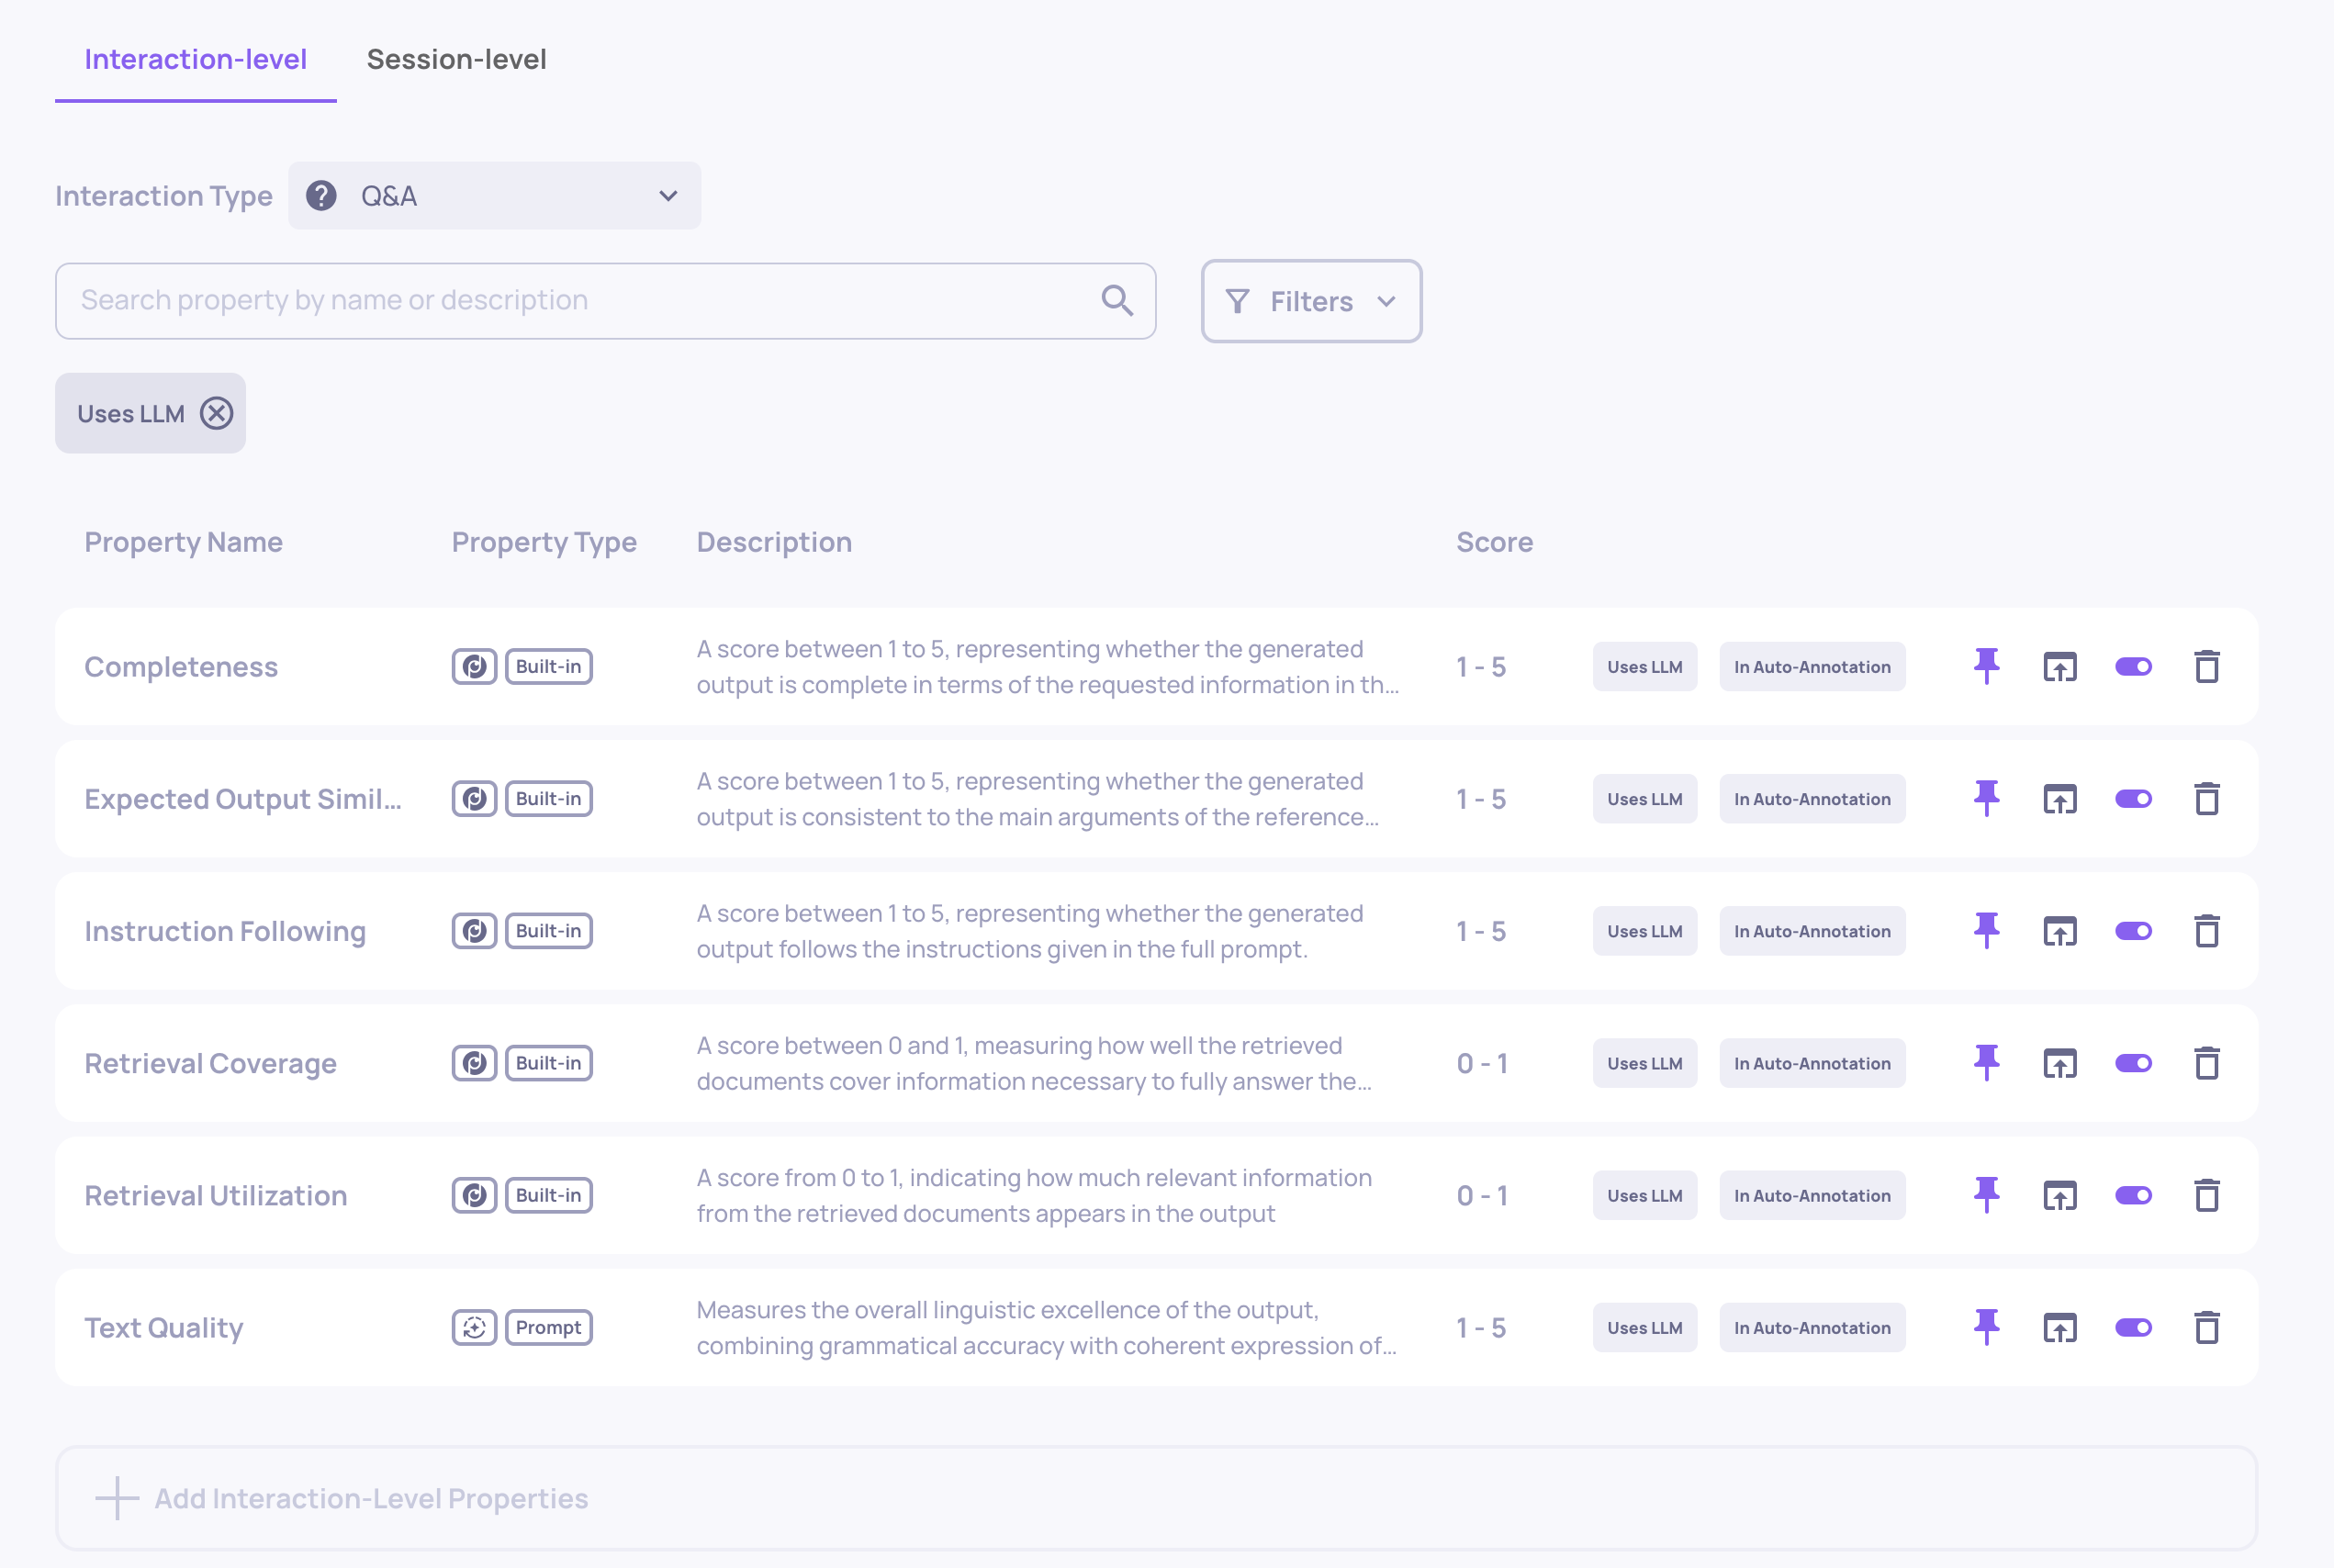
7. Choose Your Properties Wisely
Each LLM property runs inference on every interaction it's applied to. In agentic use cases with many spans per session, a single unnecessary property can increase your costs significantly.
Best Practice
- During configuration, review the full list of enabled properties for each application and interaction type.
- Disable any LLM properties that don't contribute to your evaluation goals.
- When adding custom prompt properties, only add those necessary for evaluating your pipeline.
- Consider whether you need a property on every interaction type, or just on specific ones.
You can manage properties from the Properties page in the sidebar for each application.
8. Optimize What Data Gets Sent to LLM Properties
LLM properties evaluate the data logged in your interaction fields - whatever is in the input field is used as the input, whatever is in output is used as the output, and so on. If these fields contain more data than what's actually needed for evaluation, you're paying for unnecessary tokens.
Best Practice
- Review what data is being logged into
input,output, andfull_prompt. - Where possible (especially with manual instrumentation), trim these fields to include only the content relevant to evaluation.
Use the "Step" Field for Auxiliary Data
Deepchecks provides a Step field that lets you log additional data alongside an interaction without it being automatically sent to all LLM properties. Steps are named sub-parts of an interaction (e.g., "Information Retrieval", "Action", "Tool Response") and can also be custom-named.
- Log data that you need for specific prompt properties into a dedicated step rather than using
inputorfull_promptthat contain much more data. - Configure your custom prompt properties to reference the specific step they need, rather than processing the entire interaction payload.
This is especially useful in agentic flows where each span may carry substantial context that only a subset of properties actually needs.
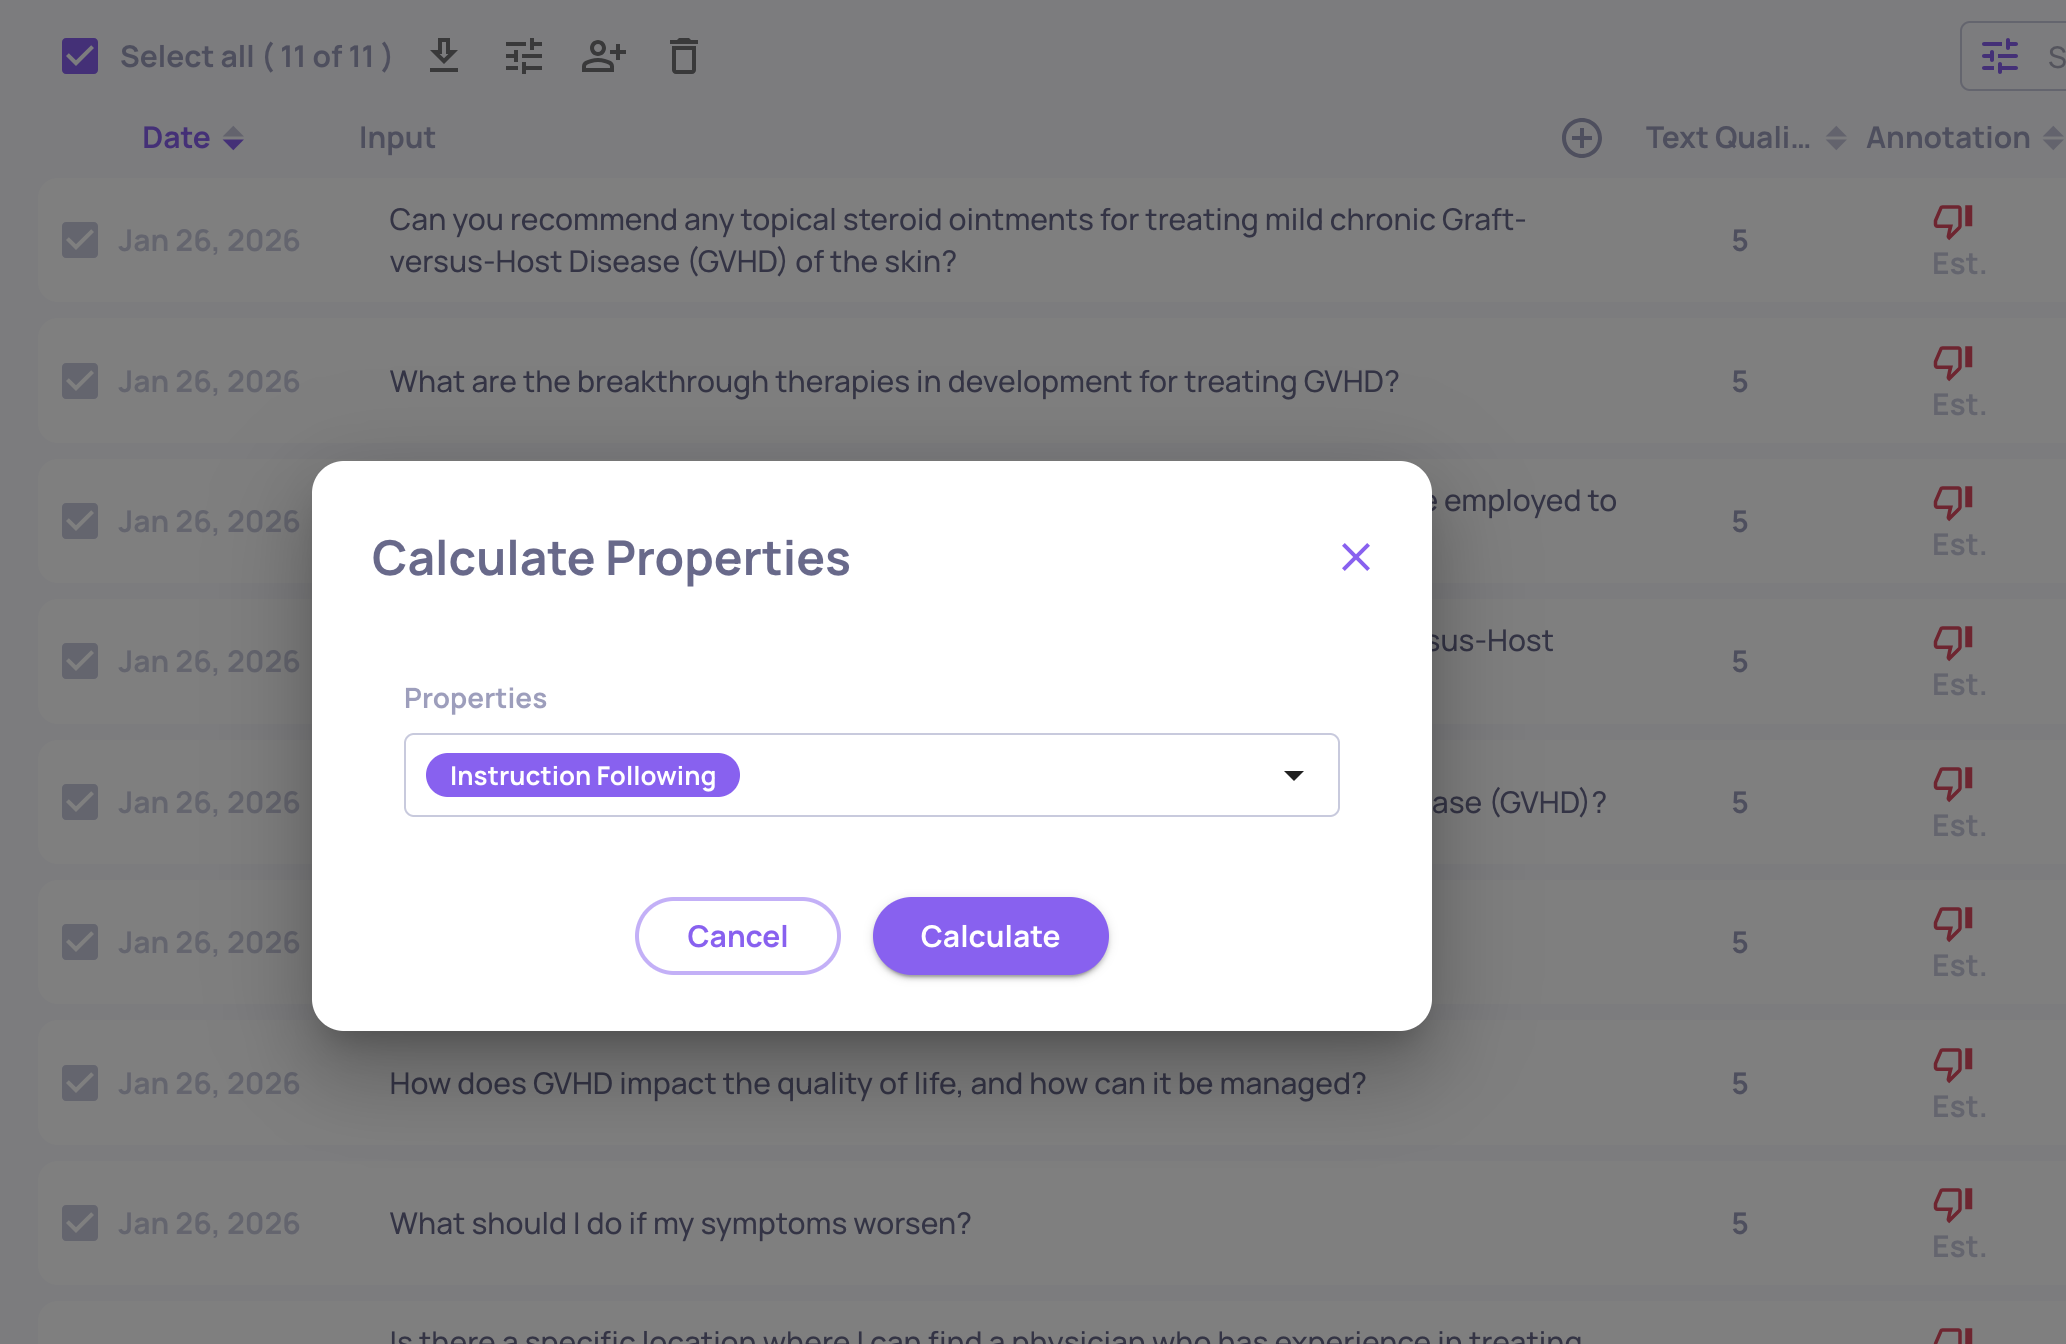
9. Pause Heavy Properties and Run Them Selectively
Not every property needs to run on every interaction. Deepchecks lets you pause properties so they don't calculate automatically on new data - and then run them on-demand against specific subsets of your data.
How to Pause a Property
- Navigate to the Properties page (sidebar) for your application.
- Find the property you want to pause.
- Click the toggle icon to switch it to the paused state.
Paused properties:
- Are skipped on all new data uploads (no LLM cost incurred).
- Preserve all existing scores.
- Remain available for on-demand calculation.
Running a Paused Property on Specific Data
- On the Interactions page, select relevant interactions (spans) and then click the "calculate property" icon.
- Select the property you want to calculate from the dropdown and confirm.
- The calculation runs in the background on the selected interactions.
Example Workflow
- Upload your data with only lightweight properties active.
- Review results, annotations, and initial metrics.
- Identify the interactions that need deeper analysis (e.g., interactions annotated as "bad" or flagged by other properties).
- Run your heavy properties only on that subset.
This approach can reduce costs dramatically - especially for expensive properties that would otherwise run on your entire dataset.
Part 4: Monitoring & Ongoing Optimization
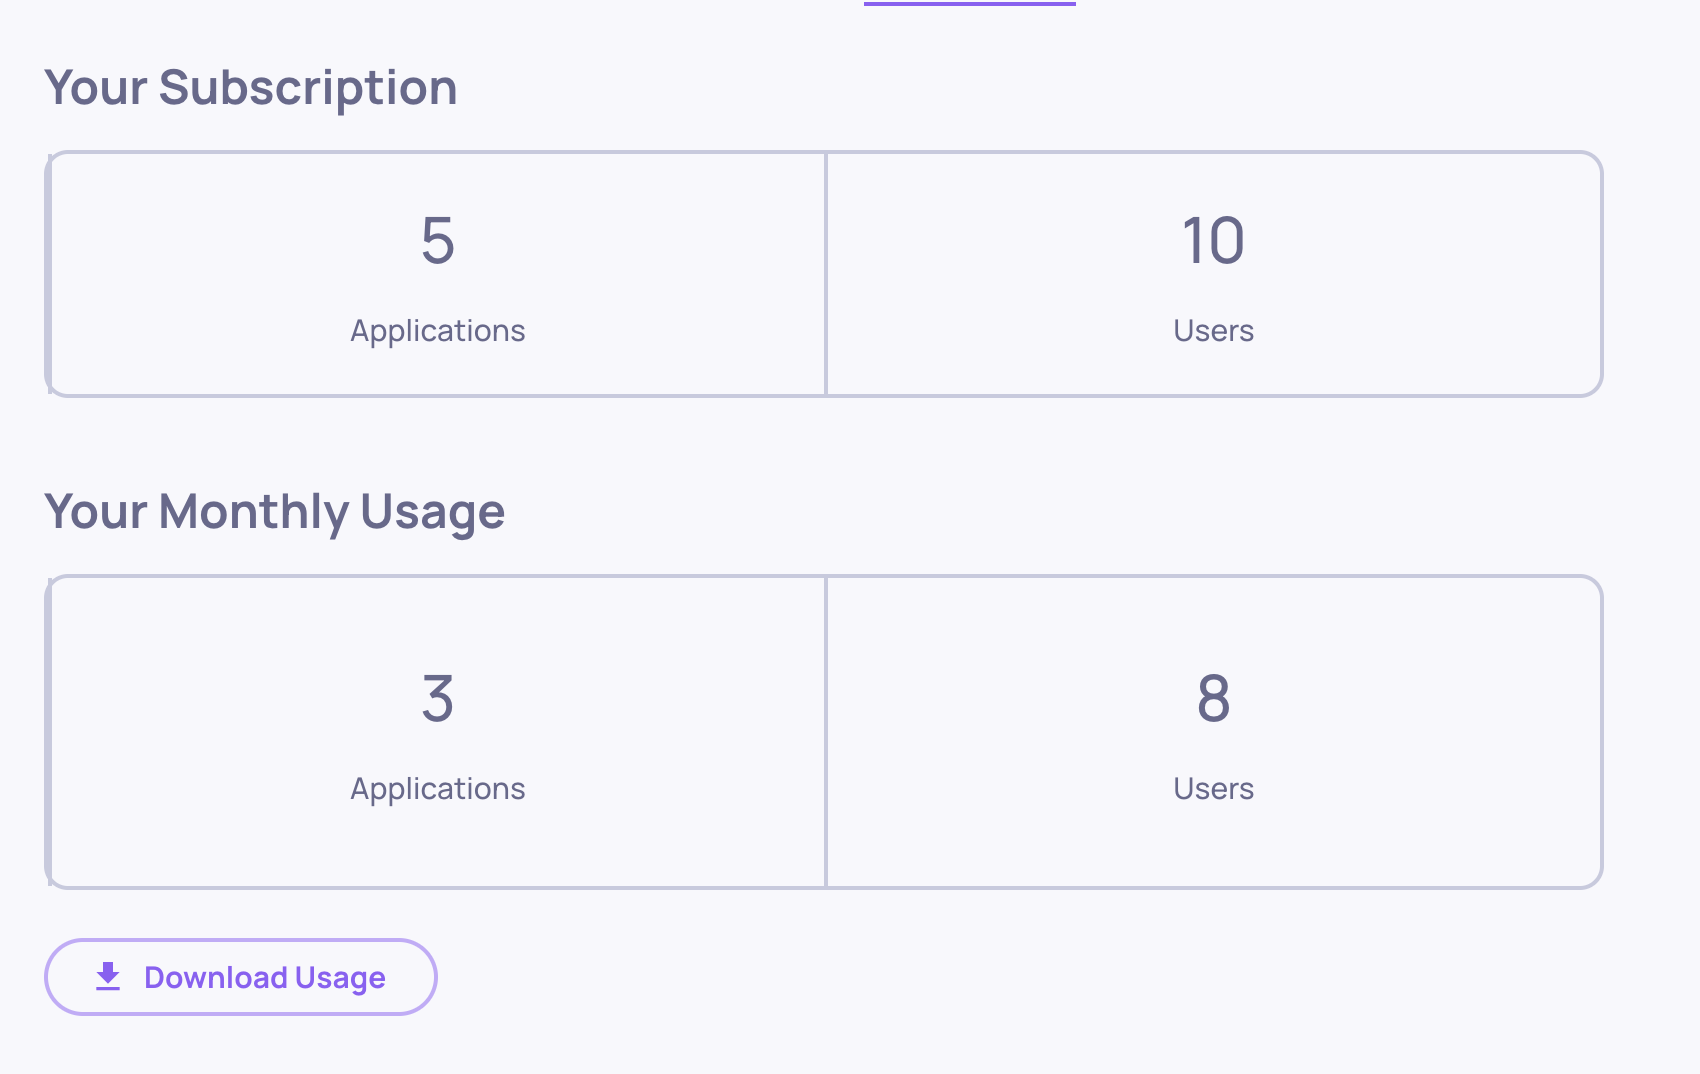
10. Use Usage Tracking to Identify Cost Drivers
Deepchecks provides granular usage tracking so you can see exactly where your LLM spend is going and make informed decisions about where to optimize.
Workspace-Level Usage
- Navigate to Workspace Settings → Usage tab.
- Click Download Usage to export a CSV with token consumption broken down by application, version, environment, service type, and model.
How to Use This Data
-
Identify which applications and versions drive the most LLM usage.
-
Identify which properties or service types consume the most tokens and drive the most cost.
-
Think about ways to optimize that property or service.
Summary: Cost Optimization Checklist
Platform Configuration
| # | Action | Impact | Where |
|---|---|---|---|
| 1 | Use Haiku 4.5 for basic model | High | Preferences → Manage Models, then Edit Application |
| 2 | Disable language detection | High | Preferences → Application Settings |
| 3 | Disable topic classification | Medium | Preferences → Application Settings |
Controlling Data Volume
| # | Action | Impact | Where |
|---|---|---|---|
| 4 | Upload minimal data during config | High | Manage Applications |
| 5 | Right-size your evaluation dataset | Medium | Data upload pipeline |
| 6 | Set production sampling ratio | High | Edit Application → Sampling Ratio |
Property Optimization
| # | Action | Impact | Where |
|---|---|---|---|
| 7 | Remove unnecessary properties | High | Properties page |
| 8 | Trim data fields / use Steps | Medium | Instrumentation code |
| 9 | Pause heavy properties, run selectively | Medium | Properties page → Toggle / Recalculate |
Monitoring
| # | Action | Impact | Where |
|---|---|---|---|
| 10 | Monitor usage and costs | Ongoing | Workspace Settings → Usage / Cost Tracking |
If you'd like personalized guidance, the Deepchecks team is always here to help. We can work with you to optimize LLM usage for your specific workflows and use cases, ensuring you get the most value from your deployment.